|
|
|
Distressing a Bucky Skeleton
Its
important to remember that
the Bucky skeleton is manufactured primarily for the medical industry
and is not meant to look as though it has been buried for
the last
hundred years. So, you'll want to make some improvements
to give him that "fresh from the grave" look
that will make his Halloween appearance spectacular!
 After some experimentation, we developed the
following process to give the Bucky skeleton, skulls and
other bones available from the Anatomical Chart Company just that
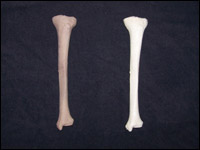
look. Take a look at the difference in the before and after
picture to the right, after "aging", the bone looks very old. The Bucky skeleton as received is
stark white, while the newly "distressed" one looks old and
creepy. Just what you need to add some realism to your
Halloween haunt! We also found that it's not at all hard to
do. After some experimentation, we developed the
following process to give the Bucky skeleton, skulls and
other bones available from the Anatomical Chart Company just that
look. Take a look at the difference in the before and after
picture to the right, after "aging", the bone looks very old. The Bucky skeleton as received is
stark white, while the newly "distressed" one looks old and
creepy. Just what you need to add some realism to your
Halloween haunt! We also found that it's not at all hard to
do.
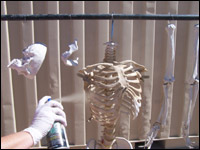
Before painting the skeleton temporarily remove the arms,
legs and skull (separate the jaw and upper skull), and hang them from a clothes line or similar
arraignment as this makes them easier to maneuver during the painting process. Make sure that
all nuts, bolts, screws and other hardware are tightened as
they will be painted over. If you will be disassembling the skeleton in the future remove
or mask any parts
you do not wanted painted.
You can also remove the red
rubber meant to simulate the main arteries in the body. The
translucent rubber that simulates the cartilage between the
vertebra is difficult to remove, so we just clip off the
ends with scissors and paint over the rest.
 The first step is to spray paint all sections of the
skeleton inside and out with one thin coat of Krylon brand
“Ultra-Flat Khaki” (#4291) spray paint. While another brand
or similar color would probably work just fine, we found
this one to work very well. This coat of paint acts as both a
primer coat and to change the color to one that looks more
like old bone. The first step is to spray paint all sections of the
skeleton inside and out with one thin coat of Krylon brand
“Ultra-Flat Khaki” (#4291) spray paint. While another brand
or similar color would probably work just fine, we found
this one to work very well. This coat of paint acts as both a
primer coat and to change the color to one that looks more
like old bone.
One can is
usually enough to spray paint one skeleton. Be sure to paint all of the
metal hardware as this will help to camouflage them from
view. Once all
parts of the skeleton have been painted, let the paint dry completely for a day.
Now
that the base coat of spray paint has dried, we're going to further enhance the look
by using a mixture of water based
acrylic craft paints and a foam paint brush to lightly wash
the bones of the skeleton. We use "Plaid - Apple Barrel"
brand acrylic paints that can be found at just about any
craft, art or department store. They are a very inexpensive,
but a good craft paint and just what we needed for this job.
The following will give you
enough paint for two entire Bucky skeletons. Mix the following together in a
small sealable container to get the color we call "Exhumed
Bones":
1 - two ounce bottle of Burnt Umber (#20512) acrylic
paint
1 - two ounce bottle of Country Grey (#20526) acrylic
paint
2 - ounces of tap water.
Using a
small foam brush, paint a very thin coat over a few of the
bones, not the whole thing or the paint will dry and we
don’t want that yet. Its okay if you don’t get every nook and
cranny because we want an uneven look. Periodically wet the
brush in water and shake out.
Before the paint starts to
dry, take a sheet of plain white paper towel, Viva paper
towel works best, and pat, not
rub, most of the paint off. This will leave what looks like
uneven stains. Take care not to let the paint run or you
will have drip and run marks. Continue this process until the
entire skeleton has been stained. We like to wear latex
surgical gloves when painting to keep our hands from getting
covered with paint. Even though the bones will
look and feel dry in just a few minutes, you should let them dry
thoroughly for a day before re-assembling the skeleton.
Once
you've put the skeleton back together it should look as though it has been
buried for a very long time and much more realistic as a
Halloween prop.
Skull Eye
Sockets
We think that skulls look a lot scarier when the
inside of the facial
sockets have been darkened to give the impression that they
are open all the way through to the cranium. To do this we
use flat black acrylic craft paint and carefully paint the
inside of the each eye socket, the nasal passage, the back
of the mouth and inside the cranium. You can use a small
artist's brush for the part closer to the outside of the
skull, and a larger brush for the rest of the inside.
◄BACK
|
|