|
Below is how
we created a lighted pumpkin walkway running down our
driveway and to our front porch. It is easy to make and most
of the materials are inexpensive. The Pumpkin Lights are the
most expensive items, but are worth it. And remember, you
only have to buy them once and you have them forever.
Make sure you
use translucent plastic pumpkins as the foam type will not
show light through the body, only the carved portions, and
don't look as impressive.
The advantage
of using independent battery operated lights instead of AC
powered ones to illuminate the plastic pumpkins is that you
don't have to worry about extension cords for people to trip
over and the effort of trying to string them all together
over a large distance.
Materials
List
16 - Plastic Pumpkin Pails
16 -
Pumpkin Lights (and batteries)
16 - 5 foot
sections of 3" ABS pipe
1 - Glue gun and
glue sticks
1 - Medium Grit Sand Paper
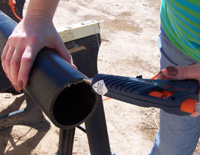
Cut
and Prepare the Pipe
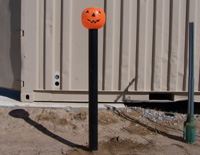
We use ABS pipe to make the posts for the pumpkin pail
lights, four feet above ground and one foot buried. This
plastic pipe usually comes in ten foot sections from the
hardware store, so you will need to cut them into pieces
five foot pieces.
You can cut the pipe with a handsaw, table saw
or chop saw. If you cut them by hand make sure
you get a least one end straight so that the
pumpkin pail will sit on it flat. Sand down the
end that you will be gluing the pumpkin pail to
so that the glue adheres evenly.
ABS pipe is naturally black in color, but tends
to look a little bit shiny. It also has the pipe
specifications printed on one side. While you
don't have to, you can spray paint the post with
flat black spray paint to make it dull and cover
up the printing.
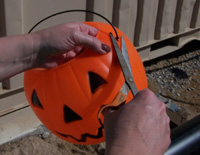
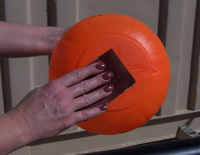
Prepare the Pumpkin Pails
Remove the plastic handles from the pumpkin
pails by pulling them out with pliers or
snipping them off with scissors. Roughen up the
bottom of the pumpkin pail with sand paper so
that the hot glue will adhere to it better.
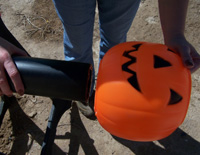
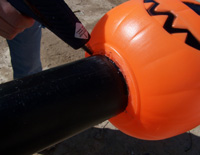
Glue Them Together
Using a hot glue gun, glue a pumpkin pail onto a
section of the plastic pipe and let dry. Be sure
they are centered and flat on the post. Repeat
this process until all sixteen are glued
together. Remember, the tip of the glue gun and
the glue that comes out is very hot, so use
caution and be careful.
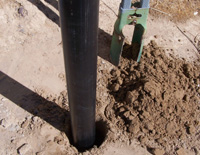
Bury Them In The Ground
You must decide what distance you want the
lights to be from each other. This will depend
on the length of your driveway. We separated
ours six feet apart giving us a forty-eight foot
long row of light posts, but you can distance
them any amount you like.
Next, dig a one foot deep hole large enough in diameter for the base of
the mast to fit into. You can use either a shovel or a post hole
digger like we did to dig the hole. Slide the base into the hole
making sure that the face on the pail is pointed
in the direction you want it to be and
then fill with dirt around the post. Tamp the dirt down around the board firmly to make a
secure foundation.
Plastic Chain Addition
If you want to connect the light posts together,
you can use 2 inch black plastic chain. We used
metal screw-in eyelets screwed into the posts to
connect the chain to. Plastic chain can
sometimes be found at hardware store, but can be
ordered online at
www.mrchain.com.
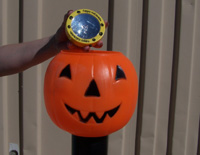
On Halloween Night
Place a
Pumpkin Light in each pumpkin pail and
switch on just before sundown for a great
driveway display! |