|
|
|
While
we are decorating our homes for Halloween, let's not forget
that one part of ourselves that we can decorate, too, ladies! Our
finger and toe nails, of course! Fashion trends say that short,
just above the finger tip
nails are in again this year and that's all well and good for some people
like run-way models but some of us still love the look of
longer nails! If you aren't one of them, at least for the month
of October why not put on some claws and deck them out for
Halloween? Or, if you are a true Halloween fanatic, keep
them this way all year long!
I was a licensed manicurist, make-up artist and
cosmetologist for many, many years, so doing my own nails isn't a problem for me. But if you
aren't proficient in doing acrylic nails, you can find places in just about any mall or
town that will do a set of nails to your specifications for twenty dollars,
sometimes less if on sale.
You can have some claw-like nails put on at a salon or
do them yourself if you can. One of the best nail tips, the ones I always use, are KISS™
Hawk Curve but they have gotten hard to find over the past years. Good
thing I stocked up! Any brand will do, as long as they are
long and have a curve to them.
I use
All Season Professional or ASP
brand carried at Sally Beauty Supply. The
Vivid Pink colored powder makes a natural looking nail, it doesn't yellow
and lifting isn't a problem. Using this product along with nail tips, you can make them relatively thin and
have little or no breakage. Any brand will do, but the better product
comes from beauty supply stores.
Once you have your nails on or if you have
your own natural nails ready to go, here are some ideas for painting your nails that you
can do yourself. All it takes is a steady hand and a little time for drying. Start
off with a fresh manicure and two coats of clear nail polish. Make sure it's nice and dry!
You'll also need these things:
- French tip guides for toe nails
- Black nail polish
- Orange nail polish (shade of your choice)
And here's what I did:
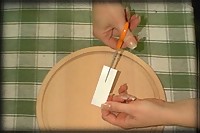
| You can buy French tip
guides for toe nails that are a straight line. These work best. If
you can't find those use French Nail tip guides
in the Chevron style. Take the Chevron guides and cut them down the
center of the "V". You can find the nail guides at most any drug or
department store that carries nail products. |
 |
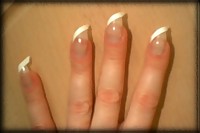
| Use one side to make a diagonal slash across
the nail tip. Stick one side to the free edge of the nail and bring it across to the
opposite side. You can start it at either nail edge, I always seem to start
at the right tip and
go diagonally down left. Do the opposite hand in the opposite direction so if you held two
fingers together it would form a "V" again. |
 |
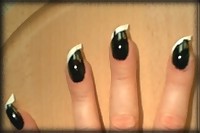
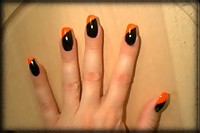
| It's up to you which you want for the main
color. I prefer black with an orange tip. Use two coats of any black nail polish, if you
have a thick nail polish, you can use one good coat. Start at the
nail base (just above the cuticle) and paint up
to the tape, making sure not to go completely over it. Let each coat dry fairly
well. |
 |
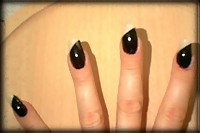
| Remove the strips carefully. If you
have painted over the edge, you'll have to lift them slowly or the
polish will leave a jagged edge. Now you'll have a black base and a
natural nail tip. You can basically use any color you want on the
tip, red looks good for a vampire. But I love Halloween colors, so I
use orange. Orange polish always seems to be thin no matter the
brand, so you'll probably need three coats. |
 |
|
After the paint has dried completely, follow
it up with a couple coats of clear to seal it and you are all set to show off your
Halloween spirit! I get tons of compliments on them no matter what time of year I wear
them and you will, too! Wait till you see what most orange polishes look like under a
black light! They light up neon orange! Way cool! |
 |
With all the fun colors of
nail polish available today, you can find many different shades of orange to choose from,
from a mild pumpkin orange to neon orange. Let your imagination be your guide!
|
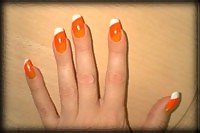
Candy Corn, who doesn't love it? A variation
that I've done is the "Candy Corn" nail, seen on the right. Using the same
technique as described above, first make a yellow layer on the bottom (close to cuticle) ,
when it dries make an orange layer in the middle. When that dries, if you have a steady
hand, you can add the white without using the strips. Use any color yellow you like, there
are so many shades of yellow and orange to be found! But we went with the true candy corn
colors. |
 |
TIPS: Use
thin, even coats on this type of effect or you'll end up
with a bump where the colors meet. You may have to use an
extra coat but they'll look better in the long run. Ever
wonder why your nails are so yellow after you take your
polish off? Dye from nail polish adheres to the nail if you
don't use a couple coats of clear polish to seal your nails
before applying color. That may look fine for a special
effect at Halloween but in everyday life, stained yellow nails don't look so hot!
article by Dawn de la Morte'
NAIL ART
PAGE 2
|
|